The University of Divinity is committed to the use of one
basic referencing style for theology courses, which is based
on the latest version of the Chicago Manual of Style.
Assessment is a crucial quality measure in higher education, a key motivation for student learning, and an important part of curriculum and learning task development. Information on this page is a summary of a selection of University policies relevant to assessment.
This document provides an overview of the software you may need during your study.
You will need access to a computer in order to access your unit’s resources,
produce assessment work, engage with others, administer your course.
System Requirements for ARK
ARK is based on the Moodle Learning Management System (LMS). To run Moodle
effectively, you should - as a minimum - use the following system components.
If you do not, Moodle may still work, but some functionality may be lost.
Workplace IT environments’ internal configurations can also restrict the
functionality of Moodle. Access to content may be affected, as may the ability
to upload files, and file size limitations may also apply. Workplaces may have
older versions of software, with which Moodle may not perform well.
Operating system - desktop and mobile
We recommend that you use a supported version of your operating system which
will receive security fixes:
Use a broadband connection through WiFi, 4G/5G mobile, NBN, ADSL2+, fibre optic
or cable with the speed:
Viewing lecture recordings or conferencing - at least 5MB/sec
Viewing images and webpages - at least 2MB/sec
Mobile devices
The Moodle Mobile app is supported and you can connect via the QR code found in
your profile after downloading the app from Google Play or Apple’s App Store.
The Moodle theme has been developed to scale to the size of your screen, but be
aware that not all content has been designed to be legible/useable at a small
screen size. It is not recommended to use older versions of operating systems
that are out of support.
Internet browsers
Compatible browsers include the following. We recommend that you keep your browser up to date.
Google Chrome (recommended for optimal compatibility, this has been thoroughly tested on Windows).
Firefox
Safari (recommended for optimal compatibility, this has been thoroughly tested on Mac).
Edge
Other browsers may work but have not necessarily been thoroughly tested. Note
that add-ons and toolbars can affect any browser’s performance.
If you have any difficulty accessing ARK, check that you are using one of the
supported browsers above before you contact support. Settings
We recommend that the following be enabled/not blocked (at least for the divinity.edu.au domain):
Cookies
Popups (in both internet browser and security software)
Javascript
Assessments
Assessments typically ask you to produce something, a document, presentation,
video, speech, etc. Most of this can be done with access to an Office
Suite. Some example Office Suites are Microsoft Office, Apple iWork, Google
Workspace, libreOffice/OpenOffice.
A helpful tool is a bibliography manager, such as Zotero.
2 - ARK
ARK is the University’s Learning Management System and functions as the central component of the University’s digital learning environment.
What does ARK stand for?
Nothing really. ARK just seemed like a useful short name. We hope you feel both
afloat and in the presence of glory, but ARK alone, as a “Learning Management
System” won’t do that. In fact, it won’t make you learn, but we hope that it
will assist you in your learning.
What is Paradigm?
Paradigm is the University’s Enrolment Management System. It is used to record student details, enrolment information and grades.
Support for ARK
The documents listed below will help you get started with ARK.
2.1 - Accessing ARK
Learn how to access the ARK Learning Management System.
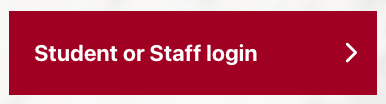
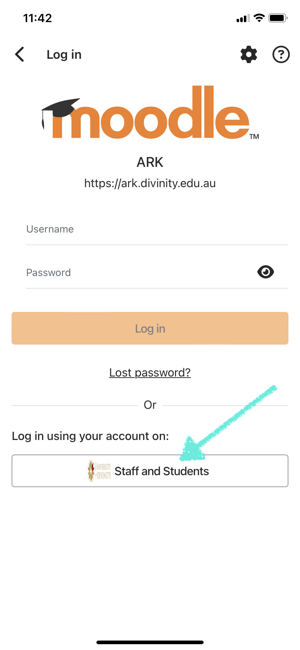
Click Student or Staff Login button from the landing page and enter your SSO credentials when prompted:
Username and Password
The login credentials for ARK are Single Sign On (SSO Account). For instructions on changing or resetting your Single Sign On account, visit the Login and Password Guide.
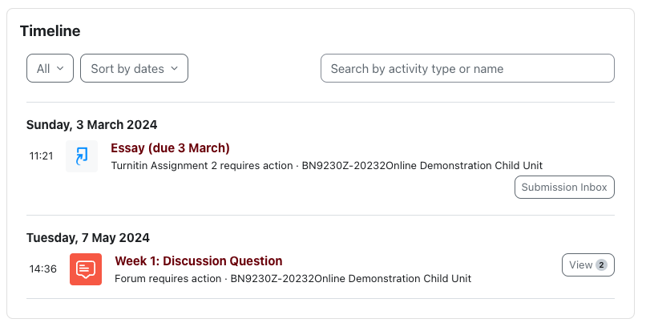
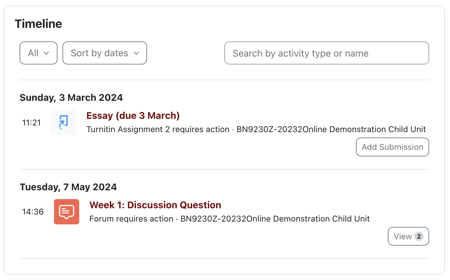
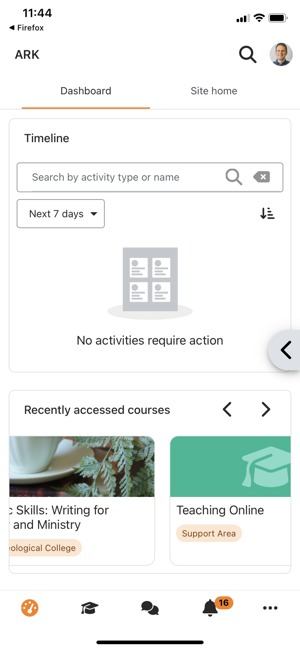
The timeline shows you activities or assessments with due dates for all units that you are enrolled in. You can customise your view of the timeline by:
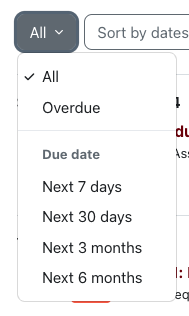
The left-most dropdown on the timeline allows you to filter activities or assessments by due date: All, Overdue, Next 7 days, Next 30 days, Next 3 months, Next 6 months:
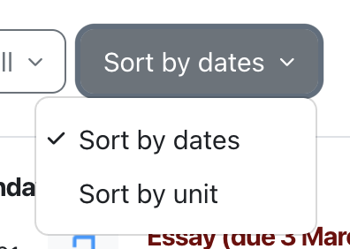
Sort by
You can choose to sort activities or assessments in the timeline by date or by unit:
Search filter
Enter a keyword in the search bar to filter by a specific term. Try searching by essay or forum.
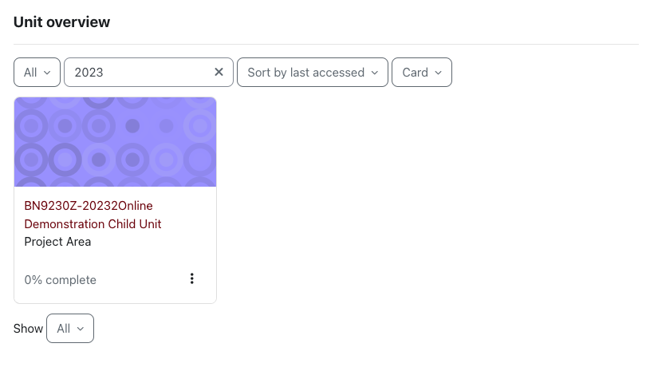
Unit overview
The Unit Overview shows you units you are enrolled in. These can be filtered or organised to your preferences.
The left-most drop down menu in the Unit Overview block allows you to select from the following view options:
All - All units you are enrolled in are displayed, unless you hidden some units.
In Progress - Units for which the current date is after the unit start date, and where no end date is set or the end date is in the future. Teaching staff can set the Start Date and End Dates of Meta Units from the unit settings page.
Past - Units for which the End Date is in the past unless Course Completion settings have been set and the course completion criteria have not been met.
Future - Units for which the Start Date is in the future.
Starred - Only units you have Starred will show.
Removed from view - If you have hidden units, you can find those units from this view.
Starred and hidden units
Starred units allow you to bookmark or favourite a set of units and only show those units. You can also choose to hide units.
To ‘star’ (bookmark) a unit, click the three dots by its name and click “Star this course”.
To hide a unit, click the three dots by its name and click “Remove from view”.
Tip
Starring units can make life easier, but its also easy to forget that you have done so. If you can’t find a unit, check the filter to be sure.
Search filter
The search field in the Unit Overview block allows you to filter by a search term.
Sort the view of units by unit name or last accessed.
View mode
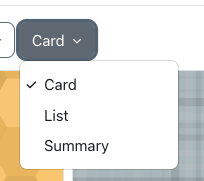
Change the way units are displayed in the Unit Overview block to Card, List or Summary.
I seem to have two units where I expect only one
To enable delivery of units where some students are studying at an undergraduate level and some are studying at a postgraduate level, the University enrols students on ARK in what are called “child units”. A child unit is specific to the level and mode of delivery that you enrolled in. To enable students in multiple levels or modes of delivery to access common resources, your unit may also have a “meta unit”.
See the Types of Units document for further explanation.
2.3 - Finding your way around a unit
While studying at the University of Divinity, your lecturers will use units on ARK to share teaching materials with you and facilitate learning activities and assessment. Teaching staff may choose to present content in different ways so if you’re unsure where to find something in the unit, you are best to ask your unit lecturer.
This document will cover the elements of the interface and uses a child unit as an example. If you’re wondering what a “child unit” is, read the Types of Units document to learn more.
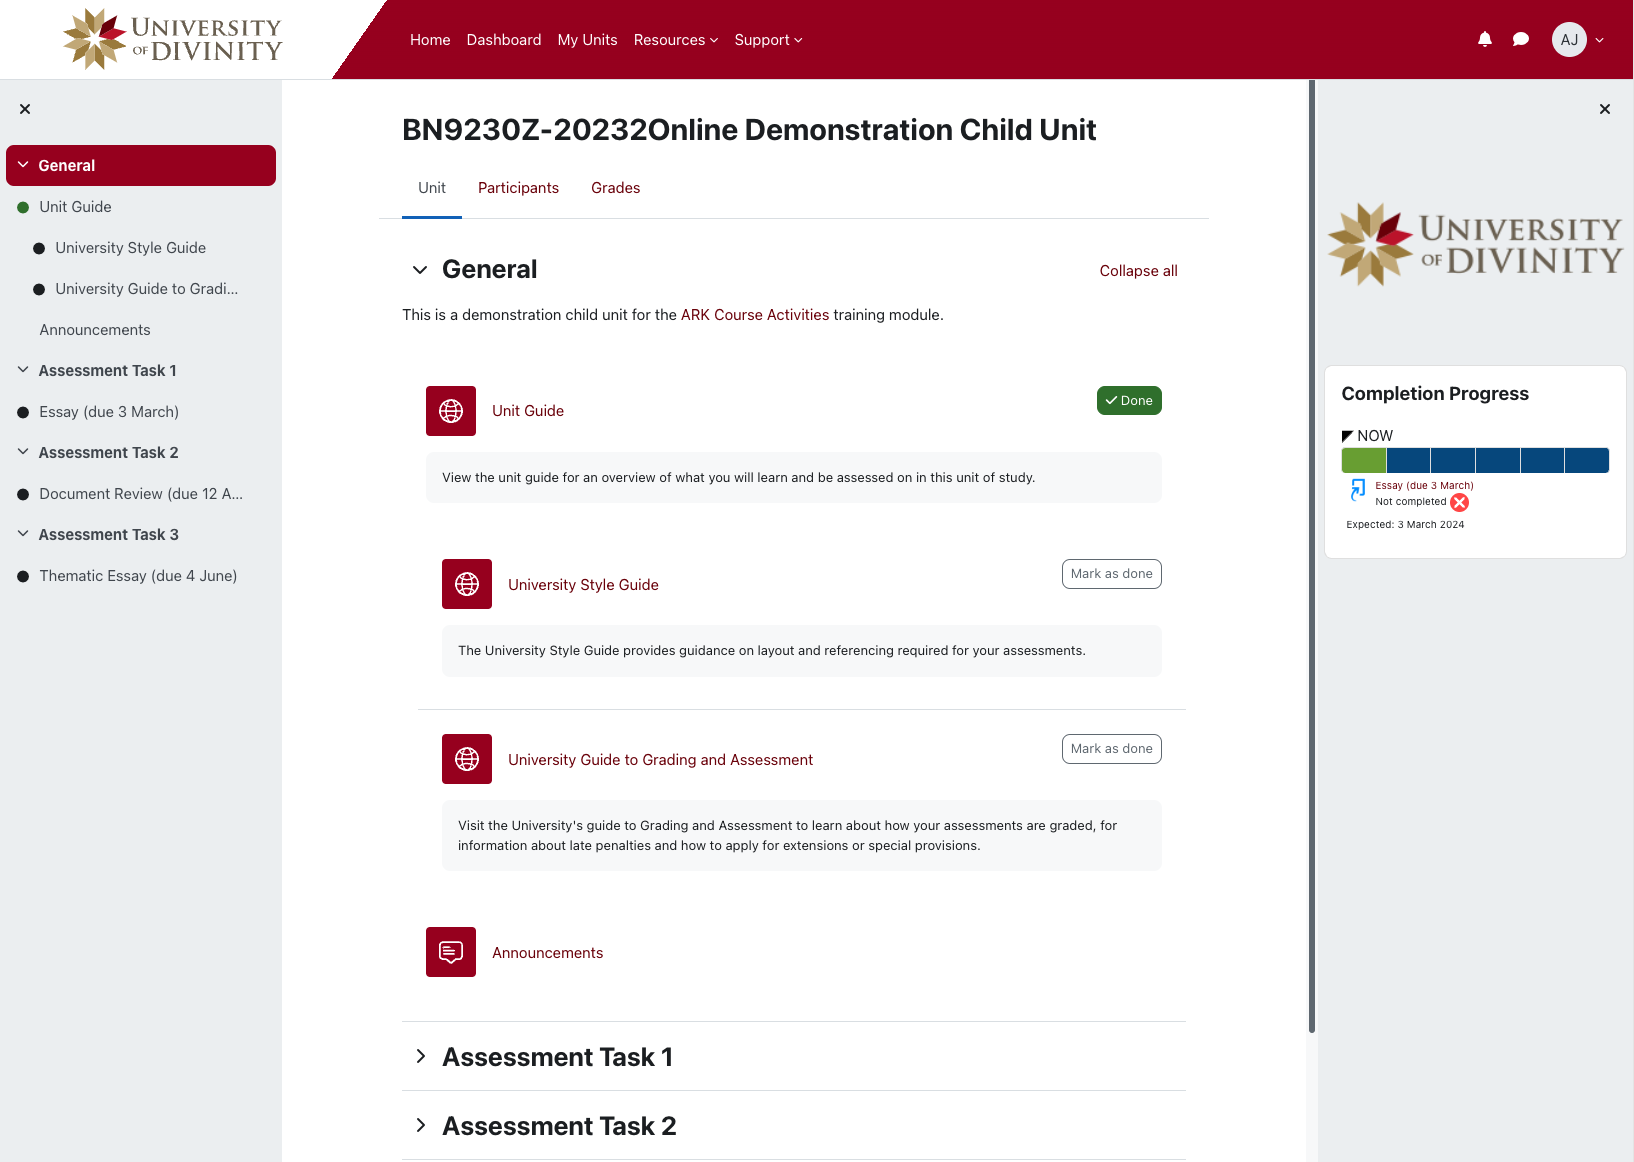
Unit interface
The unit interface in ARK comprises of a content area in the centre, a unit index on the left and a block drawer on the right:
This will show the name of the unit you are enrolled in. Meta units will have “Meta” in the name.
A child unit will have a name that looks something like BN9230Z-2032Online Name of Unit. This is simply the unit code, year and month the unit starts, the mode of delivery (e.g. Face to Face) and the name of the unit.
Contextual navigation
The submenu below the unit name provides access to a list of participants and the ability to see an overview of your grades for the unit. This menu will change based on what you are viewing at the time.
When viewing an activity, use the breadcrumb navigation to return to the unit page.
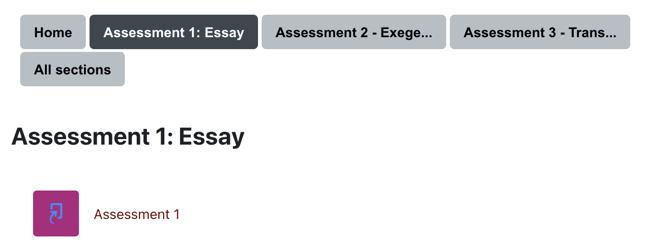
Unit index
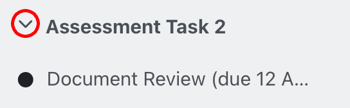
The unit index provides an easy way to find your way around the unit. This can be opened by pressing menu icon and press the X to close.
You can click the arrow to collapse sections:
Resources and activities
Your lecturer will add activities and resources to your units to guide your learning. Resources might include information pages, a virtual book, a download or a link to resources elsewhere such as the Library Hub.
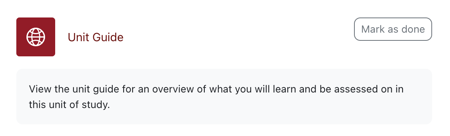
Activity completion
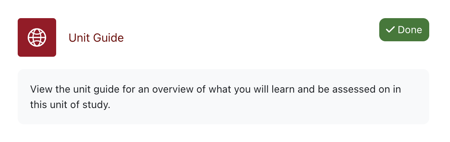
Your lecturer might mark an activity or resource with completion requirements. You might be able to mark activities as done yourself, such as this example:
Click on Mark as done and it will change to show as done:
Your lecturer may also set criteria to complete an activity. In that case, the tasks you are yet to complete will show as To do:
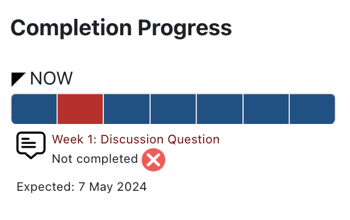
Your lecturer may add a Completion progress block which will help you track where you are up to, and show you which activities you need to complete (completed activities will be green, overdue activities will be red). Hover over the coloured squares to see what you need to complete:
Activities with deadlines set will also show in the Timeline on your My Units page:
Blocks
if your lecturer has added blocks, these will display on the right. You can see the blocks by pressing the left arrow icon and the X to close.
2.4 - Types of Units
While studying at the University of Divinity, you will hear your lecturer refer to child unit and meta unit. Units at the University of Divinity are often delivered to students studying at different levels (e.g. undergraduate or postgraduate) or delivery modes (e.g. online or face to face) which have different assessment criteria.
If you can’t find your units, contact your lecturer, or the school or college where you are taking the unit.
Child unit
To ensure you are assessed based on the unit you are enrolled in, your assessment tasks and information will be found in a unit known as a child unit. In the child unit, you will find a link to the Unit Guide, information about marking and assessment criteria, and assessment tasks. Depending on the assessment task, this might be a quiz or a assessment task submission zone.
The child unit will have a name that looks something like BN9230Z-2032Online Name of Unit. This is simply the unit code, year and month the unit starts, the mode of delivery (e.g. Face to Face) and the name of the unit.
Meta unit
If the unit you are studying is also being delivered to students studying at different levels or delivery modes, the common learning materials and activities will be placed in a meta unit. This allows your lecturer to do things like invite you to participate in online discussions with all students studying the unit regardless of assessment criteria.
The meta unit will have ‘Meta unit’ in the name of the unit.
2.5 - Add profile picture
How to add a Profile Picture on ARK
Adding a profile picture will help people recognise you when you participate in activities on ARK such as forums.
Step 1: Login to ARK using your login email and password.
Step 2: Click on your name in the top right corner.
The following fields are visible in ARK, but not editable. These values are
derived from Paradigm. Once changed in Paradigm, these values will be available in
ARK after the scheduled data sync.
NOTE:
a = visible to user
b = visible to others
c = visible to teachers
Field
visible to user
to others
to teachers
Username
a
c
First Name
a
b
c
Surname
a
b
c
Country
a
c
Phone
a
c
Mobile phone
a
c
Group^
a
b
c
^if assigned to a group and it is “visible”, within the unit where the Group is set up)
To change your user profile:
Log into ARK
Click on the your name, profile picture or the down arrow from the top right
of ARK.
Click on ‘Profile’
Select Edit Profile in the User details section:
You are presented with your profile and can make changes. The greyed fields
are not editable as this information comes from Paradigm (see above).
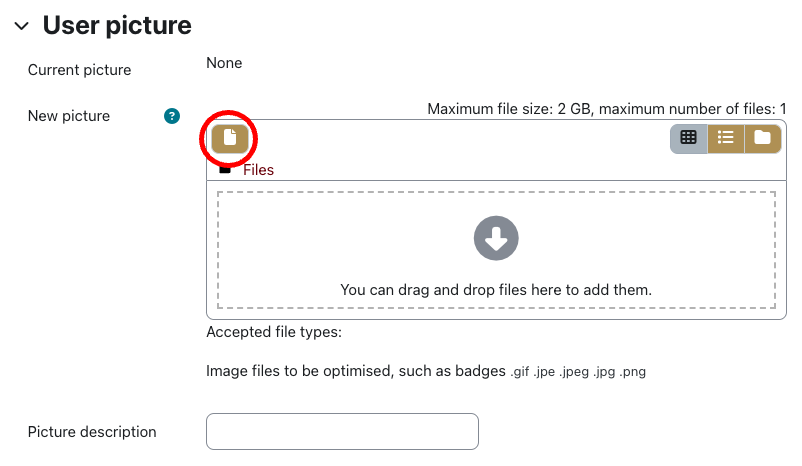
ARK allows for each user to have a ‘profile picture’. This is useful so that
other students in your classes and academic staff can better recognise you.
In order add a picture, simply drag and drop the image from your computer,
into the browser and the ‘User picture’ section, placing it on the area
containing the purple arrow.
Click the Update Profile button on the bottom of the screen.
My name shown in ARK is not the name I use
For many of us, the name we are known by is not our formal/legal name.
Paradigm (the University students information database) allows a preferred name to be recorded.
This syncs over to the Alternate Name field in ARK and is displayed to other users of ARK. To check this
Log in, using the same username and password as for ARK
Choose View Details from the menu on the left
Check the Preferred Name field that is displayed - the default is to be the same as your Given Name(s)
If you wish to update your profile to use the name that you are known by
contact the Registrar at your Home College.
When others click on your picture or name, they will now see your
preferred name and surname. However, your formal name will still be listed in units when
academic staff look at student information.
2.6.1 - ARK timezone
ARK’s system time is set to Australian Eastern Standard Time (the main servers are in Sydney, thus server time is Sydney Time).
If you wish to change your time zone (ALC students and staff for instance, and those in other places) you can do this.
This will mean that when times and dates are displayed in ARK, they will be adjusted for the time zone you set.
To (re)set the time zone:
Log into ARK
Click on the your name, profile picture or the down arrow from the top right
of ARK.
Click on ‘Profile’
Select Edit Profile in the User details section
You are presented with your profile and can see the Timezone field in the
General section.
Clicking on the Timezone field presents you with a LONG list of
possibilities! Below shows the default setting, based on the server’s
timezone.
Scroll to your selected timezone (here Melbourne)
Click on Update Profile
2.7 - ARK on mobile devices
Can I use ARK on my phone?
Yes, you can open ARK in a browser on your phone. ARK automatically presents you
with a mobile version of the site.
Connecting to ARK in the Moodle Mobile app
You can also download the Moodle Mobile app for Android, iOS and Windows
mobile devices. You can find it in your app store or at
https://download.moodle.org/mobile/
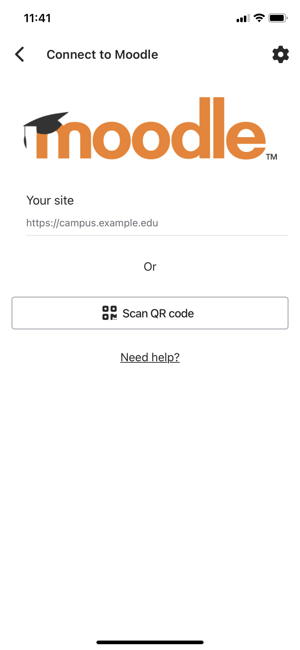
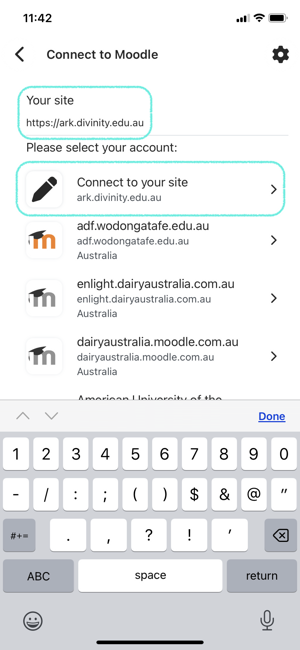
When you first load the app you will need to set up the site that you want to
connect to (the app supports multiple sites). You are presented with the following screen.
Note the Scan QR code button will not work.
Then click on Connect to your site from the list that is presented.
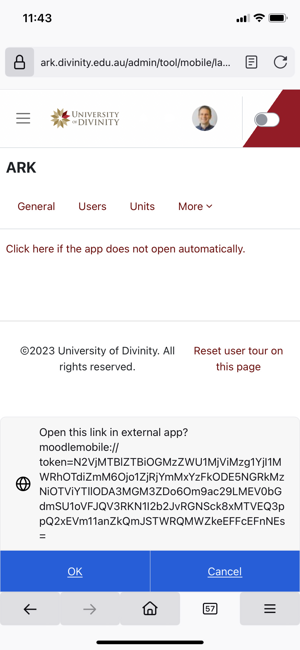
You will then see the ARK login page.
Click on Staff and Students to log in using the University’s SSO. The username and password fields will not work.
The web browser on your device will launch and you will be prompted to sign into
the SSO server in the same way that you would log into ARK on a computer.
Mobile security
You can confirm that the connection is secure with the padlock and the site is
the University’s domain of idp.divinity.edu.au
Log in with your email address and password. On success you will be logged into
ARK in the web browser and prompted to return to the Moodle Mobile app. Click on
the text Click here if the app does not open automatically if you are not
prompted.
Click OK. You are now logged into ARK. Your Moodle Mobile connection to ARK is saved and you will
not have to log in again unless you explicitly log out of site in the app.
2.8 - Messaging
Can I contact others in my unit?
Yes, you can contact any member of a unit in which you are enrolled (including the
teacher) without knowing contact details.
From within a unit (i.e., not from your home page), you can open the
Navigation menu where you should see the CURRENT UNIT in which you are
enrolled. Clicking Participants will open up a
list of all participants in that unit.
You cannot see contact details, but you can send a message through ARK, by
clicking on the person’s name and then choosing Message below the
person’s picture or icon.
The messaging interface will appear to the right, with the person selected as
the recipient. Type your message and click the paper plane image to the right.
The message will sent and the person notified. Notification depends on whether
they are currently logged in and their messaging preferences.
You should only send messages to others when the content is related to the unit
of study.
2.9 - Turnitin submissions
One of most common methods for submitting assessment work is through Turnitin. When you have completed your task, you can upload it to Turnitin for grading.
Submitting a file to Turnitin via ARK
Step 1: Locate the submission area in the child unit.
If your assignment is to be submitted using Turnitin, you will find an activity with a Turnitin icon in the child unit (the Turnitin icon is a blue page with an arrow in the bottom left corner):
Note
If you are unsure how to locate your child unit see Finding Your Units. If you aren’t sure what a child unit is, see Types of Units.
Step 2: Check the details for the assignment.
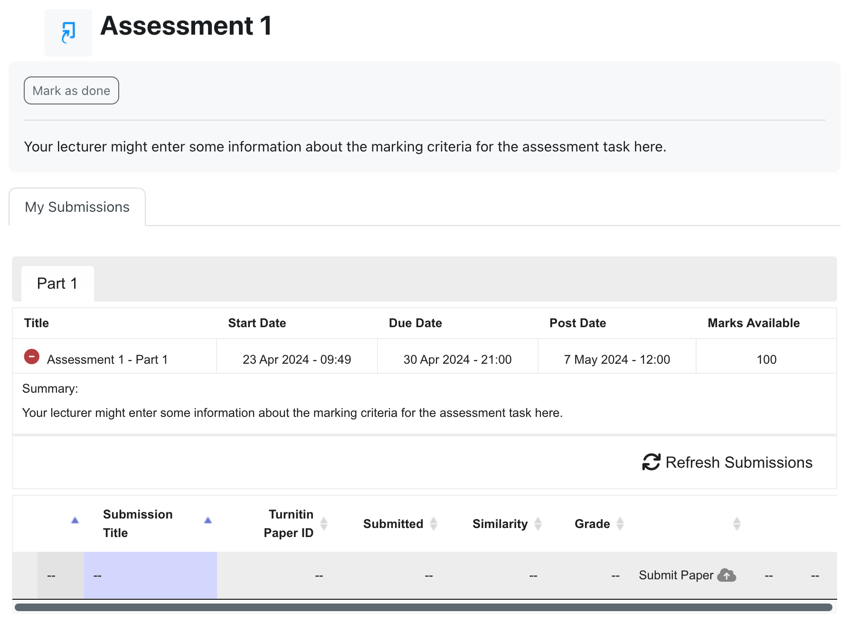
Click through to the activity to view details such as the due date for the assessment. You will be presented with an interface like below (hover over or click on the numbers to learn more):
Your lecturer may place some information about the task in the description area such as marking criteria. The descriptions marked (1) and (2) on the screenshot above are the same. The description marked (2) can be hidden by clicking the close icon .
Start Date
The date shown under Start Date is the earliest that a submission can be made for an assessment. Your lecturer may choose to set this part way through the unit delivery to ensure you have properly engaged with the content before completing the task.
Due Date
The date shown under Due Date is the set deadline for the task. In most cases you will be able to submit after this date but the submission time will display in red, indicating that the submission was late. Your lecturer may set Turnitin to not allow submissions after the due date. They will advise you on what the protocol for late submissions is.
Late submissions incur penalties as per the Assessment policy. For more information, see the Grading and Assessment page on the University’s website.
Post Date
The Post Date is when grades are released to students. This allows your lecturer to complete all the grading before it becomes visible.
Step 3: Uploading a paper for marking
Follow the instructions below to submit a paper. You will receive a Digital Receipt on screen and by email when you have successfully submitted your paper.
Submit Paper
Click on the Submit Paper link to upload your assessment task.
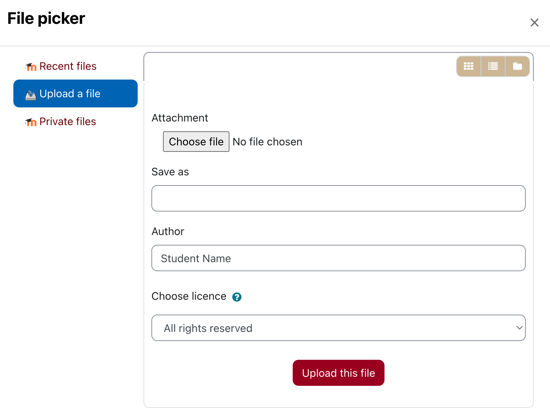
Upload your assessment
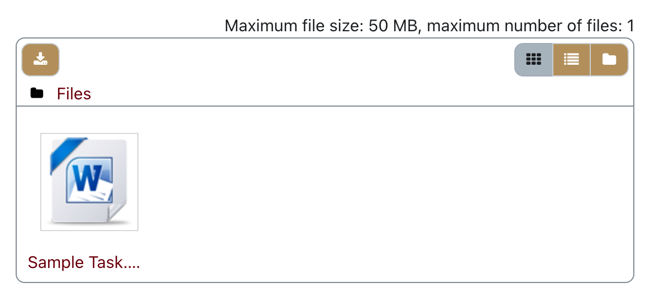
To submit your assignment you will be presented with the following form:
Enter a name for your submission. This field cannot be left blank.
Upload button
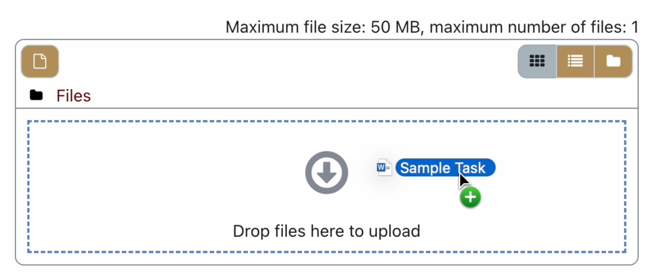
You can click on the button with a paper icon to select a file from your computer or alternatively follow the steps below to Drag and Drop from your computer to your web browser. When you click on the paper icon, you will be presented with the File Picker:
Click the Choose file button and you will be asked to select a file from your computer.
Click the Add Submission button to submit your assessment to Turnitin for similarity checking and your lecturer for marking.
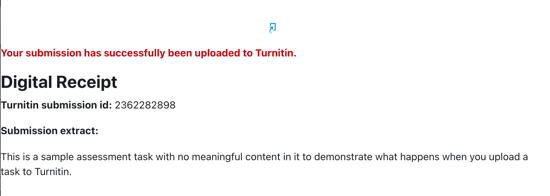
Step 4: Submission Success
Digital Receipt
When you click the Add Submission button you will be shown a Digital Receipt with an abstract of your submission as shown:
To return to the Turnitin submission page, click the Close button in the top right corner of the window.
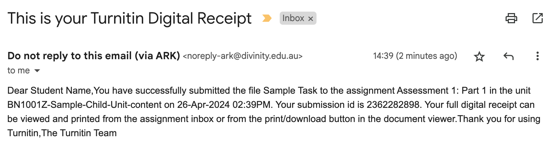
Email Confirmation
Unless you have turned off email notifications, you will receive an email confirming your submission:
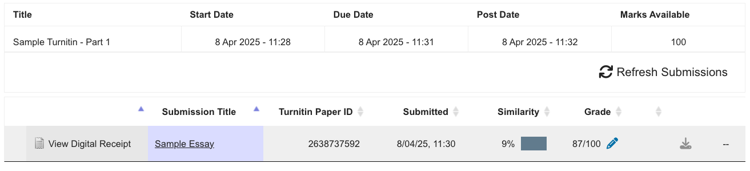
Submission view
Upon returning to the submission page you will see the information about your submission (the title you gave it, a paper ID and date of submission) in the submission area:
When your paper has been graded, you can click on the paper name to view comments from your lecturer.
Can I resubmit a file?
In cases where you would like to resubmit the file (such as if you upload the
wrong file, or after submission notice an error) you can navigate back to the
‘Submit paper’ location and click on it. Turnitin will recognise that you have
already submitted work and display a message indicating the implications of
resubmitting a piece of work. You can go through the steps outlined above to
upload another file for resubmission.
Acceptable file types
There are some limitations to the types of files that can be processed by
Turnitin.
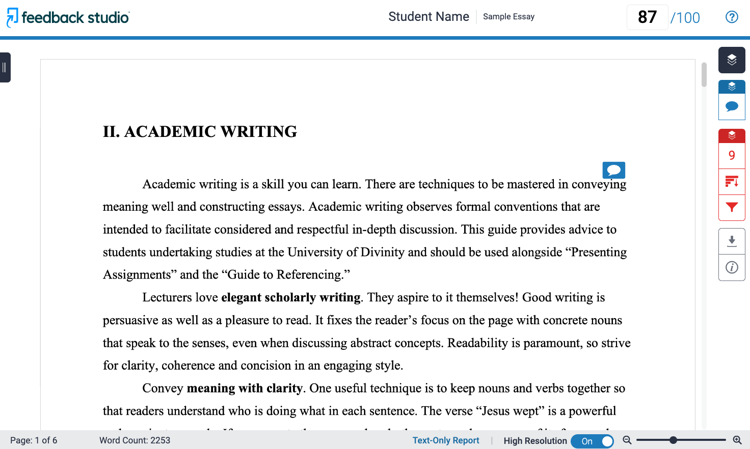
If your assignment was submitted and graded in Turnitin, you can see the grade and any feedback your lecturer has provided in the Turnitin activity. If your submission has been graded, you will see something similar to this:
If the date listed under Post Date is in the future, you will not see a grade. If the Post Date has passed and no grade is showing, check with your lecturer if they have marked your assignment.
To view feedback from your lecturer, click on the Submission Title, the coloured box under Similarity or the pencil icon () beside the grade. This will open Feedback StudioTM:
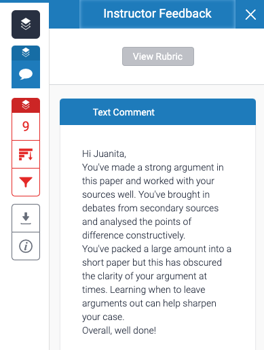
To view summary feedback from your lecturer, click the blue Instructor Feedback button in the right panel:
This will open the feedback from your lecturer:
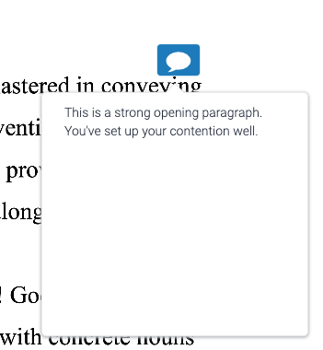
Your lecturer might also leave comments on your paper itself. These will show as blue speech marks and comments will display when you click on the speech mark:
How can I download or print my assignment with the feedback?
If you view your assignment in Turnitin there is a set of buttons down the
right hand side. Clicking on the ‘Down arrow’ will open a dialog that allows
you download your original submission, your submission receipt or a file that
looks like the current view, containing any inline comments and overall
feedback.
2.10 - Using Forums in ARK
The forum activity in ARK provides a key method of communication for students
and lecturers and can be used in a number of ways.
Profile settings for forums (site-wide)
You can update settings for the way in which you receive posts from forums.
You may see posts from the ARK User Support unit or another unit because you
have a profile setting that requests this.
If you wish to change this, in ARK, from within a unit or the home page, go to
the Administration tab, select “My Profile Settings”. You will see an option
for “Forum auto-subscribe”. You can change this so that you do or don’t receive
posts from forums.
(You can always visit a unit that you are able to access to check forums.)
Note that in some units in which you are enrolled, forums will be set up so that
you must see the postings.
You can also change the Forum Digest Type and whether you get alerts about new
forum posts (Forum Tracking).
Profile settings for forums (per unit)
Each ARK unit by default has a single announcements or news forum
3 - Library
The Library Hub is a key component of University’s digital learning environment.
Logging into digital resources
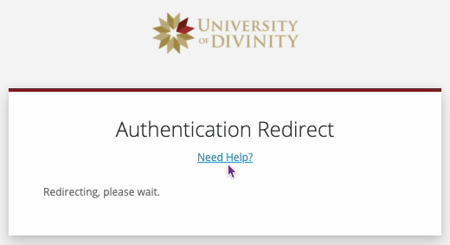
Digital resources at the University require authentication to access. This
authentication is linked to SSO and will prompt you to log in if required.
Single Sign On (SSO)
See the Login Guide for information about SSO and how to sign in.
If you are already logged in to SSO you will not be prompted, but may see a
message indicating authentication is occuring:
Using the Library Hub
There is an extensive set of documentation available at the Library Hub
Guide.
4 - Student Unit Evaluations
What are the Student Unit Evaluations?
The University values student feedback on the quality of learning experiences.
Student feedback is collected systematically through the administration of
Student Unit Evaluations (SUEs) in a manner which preserves student anonymity
and confidentiality.
Every student enrolled for credit is given the opportunity anonymously and
confidentially to complete a Student Unit Evaluation for each coursework unit of
study undertaken at the University.
Student unit evaluation data is collected for all units of study at the
University and analysed by the Academic Board and College Academic Committees.
Frequently Asked Questions
Q: Why is there a Student Unit Evaluation for each of my units?
If you are an enrolled student for credit, the University appreciates your
feedback for the improvement and development of units and their delivery.
Q: How do I access the survey?
The survey link requires you to login to ARK, the University Learning Management
System. Start here: https://ark.divinity.edu.au. Your unit link(s) will appear on your
dashboard.
Q: What if my survey link is not visible on my dashboard?
It may be that the survey is now closed as the three-week survey period elapsed.
This three-week period is from the last session of teaching until the last
assessment piece is due.
It may also be that you need to advise that you have changed your email address.
If you have changed your email address during the semester, please contact your
College and they can let the University know of the change.
Q: What is in the survey questions?
The survey is divided into two sections - questions 1 to 8 and questions 9 to 10
Qustions 1-8
There are eight quantitative questions, with radio buttons to press. Groups of
questions have headings to explain what kind of responses are requested.
Questions 1-4 These questions that evaluate the quality of the unit
1 In this unit, I developed general competencies (e.g. communication, interpersonal and problem-solving skills).
2 In this unit, I developed knowledge and skills in the defined area of study.
3 The unit was engaging and encouraged my participation.
4 I participated actively in online or face-to-face activities.
Questions 5-6 These questions are about the unit delivery quality
5 The lecturer(s) provided clear and timely information about learning (e.g. resources, activities and expected outcomes).
6 The teaching had a clear purpose which contributed to my learning.
7 The lecturer(s) gave me helpful feedback that supported my learning.
Question 8 This question is about the unit resources quality
8 Resources were provided to support my learning (e.g. ARK, Library Hub, Wi-Fi, library).
These questions are scored for responses between
1 Strongly Disagree
2 Disagree
3 Agree
4 Strongly Agree
_ Not Applicable
Questions 9 and 10
The next two questions are qualitative requiring keystrokes (up to 500
characters)
What aspects of this unit did you find helpful?
What would you recommend to improve this unit in the future?
Q: Who do I talk to about this survey if I have any questions?
Your Colleges can direct you to the appropriate leader or administrator on how
to use the survey, ARK or if you would like to discuss the questions
5 - Video conferencing with Zoom
What to expect?
To enable teaching to occur, we are using an online video conferencing platform called Zoom.
This video gives a brief orientation to Zoom.
What do I need to know generally about using Zoom?
Your lecturer will set up and invite you to any meetings for teaching and
learning.
The first time you use zoom you will be asked to download a plug-in. This takes
a few minutes, but once it’s done you are set to go, and won’t need to do this
every time you attend class.
You will be able to see the lecturer, view PowerPoints, and engage with
other students. It may feel a bit odd at first, but you will adjust very
quickly.
In terms of equipment you need access to a computer (that is not too old), and a
modern web browser so you can get in to ARK. Using a set of headphones plugged
in to your computer improves the sound quality for you, and indeed for others
too. If you have a web cam (most laptops have one) you can make yourself visible
for others to see, but this is not essential.
It is also possible to use a phone to come in to the class “live”.
Where do I download Zoom from?
You can download all of the Zoom client applications from
this page -
look for ‘Zoom Client for Meetings’. Official apps are the preferred method to
join meetings. In addition, there is a web client
hat can be used in a browser as a last resort; Google Chrome is the preferred option here.
Before the 30th May, all Zoom users will need to update the app to be on version
5.0 or higher. Otherwise, you will not be able to join a meeting.
This change is to the Zoom application itself and does not alter or require
changes to your settings or any meetings scheduled.
Mobile Devices
If you use Zoom on a mobile device, it will automatically upgrade to 5.0 if you
have automatic upgrades configured. Otherwise, you will need to visit the App
Store for your device to perform an upgrade.
Windows / macOS – Desktop Applications
Desktop apps do not automatically upgrade. You can either visit the download
page (link below) or choose the “check for updates” menu option in the Zoom app.
From the 30th May, if an older version of Zoom attempts to join a meeting, you
will receive a prompt to upgrade the app. Some older versions will offer users
the option to participate via the web and do the upgrade later.
If you are using a work provisioned device, you may need to coordinate with your
IT department to have this update installed, please refer them to
https://zoom.us/docs/en-us/zoom-v5-admin.html
6 - Zotero
Zotero is bibliographic management (referencing) software, designed to store, manage,
and cite bibliographic references.
It runs on Windows, Mac and Linux and has plugins for Word, LibreOffice, and
Google Docs that allow users to insert citations directly from their word
processing software.
In addition to the application itself, you can install the Zotero Connector for
Chrome, Firefox, or Safari. This makes it simple to create new items from information
available on the internet.
Syncing
Zotero can be used used on multiple computers and set up to sync data via an
online service. This also enables online access (via an account) to your
library.